

What Is Procreate — and Why Do Beginners Love It?
Procreate is a professional digital illustration app made exclusively for iPad. Released in 2011, it has become the go-to tool for digital artists worldwide — from hobbyists drawing for fun to illustrators creating work for major brands and publishers.
What makes it special for beginners isn't the feature list — it's the feel. Drawing in Procreate on an iPad with an Apple Pencil is the closest digital art gets to drawing on paper. The strokes respond naturally, the interface stays out of your way, and the learning curve is gentle enough that most beginners are creating real artwork within their first week.
Procreate costs a one-time fee of ₹999 (no subscription). It runs only on iPad. Over 30 million people worldwide use it — making it the most popular digital art app on any platform.
What You Need to Use Procreate
Procreate isn't free, and it requires specific hardware. Here's everything you need before you buy.
Any iPad released after 2018 works. iPad 10th gen, iPad Air, iPad Pro, or iPad Mini. Does not work on iPhone or Android.
From ₹34,9001st or 2nd generation depending on your iPad model. Pressure and tilt sensitivity make a huge difference over using your finger.
From ₹9,900Available on the App Store. One-time purchase — no monthly subscription, no hidden costs. Updates are included free.
₹999 one-timeNot sure where to start with digital art?
Join Artma's free workshop — covers the fundamentals before you spend on any tool.
The Procreate Interface — What's What
When you open a new canvas in Procreate, it can feel overwhelming. Here's a quick map of the four areas you'll use every single session.

Top-Left Toolbar
Contains the Adjustments, Selection, and Transform tools. The magic wand (Adjustments) is where you'll find filters, colour balance, and blur effects.
Adjustments live hereTop-Right Toolbar
Contains your four main tools: Brush, Smudge, Eraser, and Layers. These are what you'll use most. Tap any icon to switch — tap again to open its settings.
Used every sessionLeft Sidebar — Size & Opacity
The two vertical sliders on the left control brush size (top) and opacity (bottom). Drag up for more, down for less. Quick and intuitive once you get used to it.
Muscle memory in daysTop-Right Circle — Colour Picker
Tap the filled circle in the top-right corner to open your colour picker. Hold and drag it onto the canvas to flood-fill an area with that colour.
Tap or drag to fillEssential Gestures Every Beginner Must Know
Procreate is built around gestures. Learning these six shortcuts in your first week will cut your drawing time in half — they feel awkward at first, natural within days.
Understanding Layers — Don't Skip This
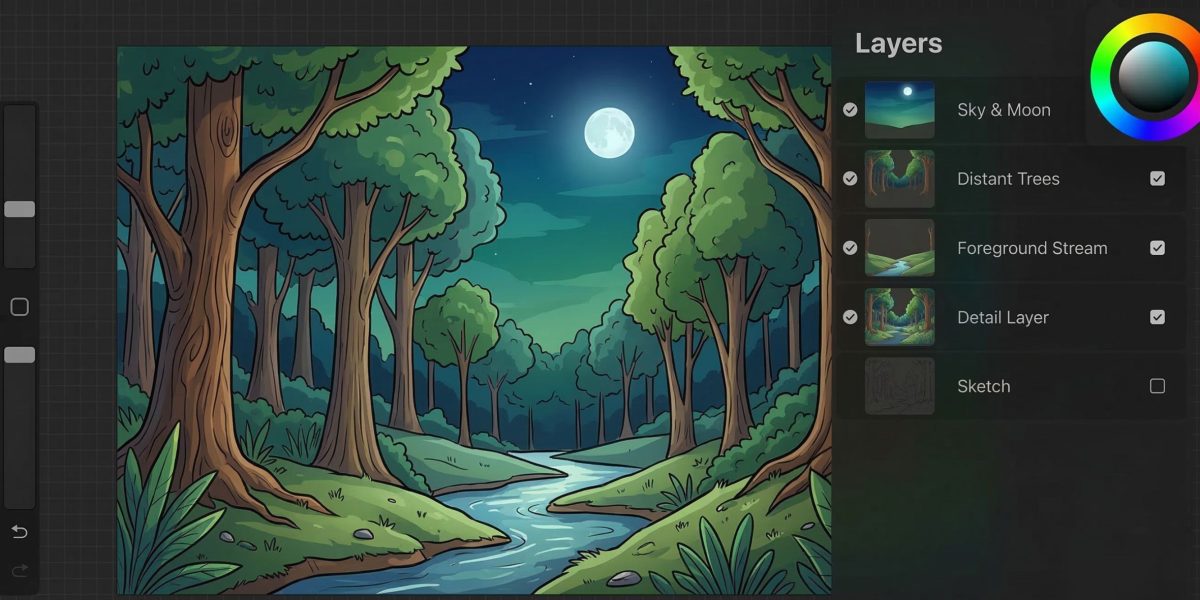
Layers are the single most important thing to understand before you draw anything in Procreate. Think of them like transparent sheets of paper stacked on top of each other. You draw on one sheet, then add another sheet on top to draw something else — without affecting what's below.

A basic beginner layer setup looks like this: your rough sketch sits on the bottom layer, your clean line art goes on a layer above it, and your colours go on layers below the line art. This way you can change colours freely without touching your lines, and erase your sketch without affecting the final drawing.
Best Procreate Brushes for Beginners
Procreate ships with hundreds of brushes. As a beginner, you don't need most of them. These six — all built into the app — are what most beginners rely on in their first year.

6B Pencil
Feels the most like a real pencil. Perfect for rough sketches, gesture drawing, and learning proportions.
Studio Pen
Clean, consistent lines with no texture. The go-to for digital line art. Pressure-sensitive and smooth.
Syrup
Slightly softer than Studio Pen. Great for illustration styles that need slightly warmer, less rigid lines.
Flat Brush
Ideal for blocking in flat colours quickly. Wide tip covers large areas fast without streaking.
Soft Airbrush
Creates smooth gradients and soft shadows. Used for shading skin, glowing effects, and backgrounds.
Round Brush
A general-purpose brush for painting, blending, and detail work. Responds well to pressure and tilt.
The First 5 Things to Do When You Open Procreate
Don't try to make a masterpiece on day one. These five steps will help you get comfortable with the app without feeling overwhelmed.
Create a new canvas at the right size
Tap the + icon on the home screen. For your first drawing, choose the "Screen Size" preset — it matches your iPad screen and is easy to work with. As you get comfortable, you can explore custom canvas sizes for specific projects.
Pick the 6B Pencil and just sketch freely
Open the brush library, go to Sketching, and select 6B Pencil. Don't think about what you're drawing — just explore how the pencil responds to light and heavy pressure. This is how you build the hand-eye connection that's unique to drawing on an iPad.
Practice the undo gesture until it's automatic
Two fingers, tap. Do this 20 times until it's muscle memory. Undo is your best friend in digital art — it removes the fear of making mistakes and makes experimenting feel safe. This single gesture changes how you approach drawing.
Add a second layer and draw on it
Tap the Layers icon (two overlapping squares) in the top-right. Tap the + button to add a new layer. Draw something on this new layer and notice that you can move or delete it without touching your sketch below. This is the moment layers "click" for most beginners.
Export your first piece
Tap the wrench icon → Share → JPEG. Save it to your camera roll. It doesn't matter that it's imperfect — what matters is that you completed the full loop: open, create, export. This habit will serve you through your entire learning journey.
Procreate vs. Other Apps — How Does It Compare?
Procreate isn't the only digital art app. Here's how it stacks up against the main alternatives a beginner in India might consider.
| App | Price | Platform | Best for | Beginner-friendly? |
|---|---|---|---|---|
| Procreate | ₹999 one-time | iPad only | Illustration, painting | ✓ Excellent |
| Adobe Fresco | Free (basic) | iPad, Windows | Painting, live brushes | ✓ Good |
| Krita | Free | Windows, Mac | Illustration, animation | ◦ Steeper curve |
| MediBang Paint | Free | iPad, Android, PC | Manga, comics | ✓ Good |
| Clip Studio Paint | ₹7,290/yr | iPad, PC, Android | Manga, illustration | ◦ Feature-heavy |
Common Mistakes Procreate Beginners Make
-
Drawing everything on one layer
This is the number one beginner mistake. The moment you merge everything, you lose the ability to edit any element independently. Use separate layers for sketch, line art, and each colour area — always.
-
Starting with a canvas size that's too small
A small canvas (like 1000×1000px) limits how much detail you can add and produces blurry exports. Start at a minimum of 2000×2000px for illustrations. Procreate will warn you when you have too many layers for a given size — that's your guide.
-
Using dozens of brushes too early
Switching brushes constantly is a way of avoiding the real work: learning to draw. Beginners who stick to 2–3 brushes for their first month progress much faster than those who spend sessions exploring the brush library.
-
Not using the reference canvas feature
Procreate has a built-in reference window (wrench → Canvas → Reference) that lets you see a reference image while drawing without switching apps. Most beginners don't discover this for months — now you know on day one.
-
Not backing up their work
Procreate saves automatically, but it saves to your iPad only. If your iPad is lost, stolen, or replaced, everything is gone. Set up iCloud backup — or regularly export your .procreate files to a folder — from day one.
From "What is a Layer?" to Creating Real Art — in Two Weeks
Learning Procreate can feel like being handed the keys to a car you've never seen before. Every button does something, every setting changes something, and the sheer number of options makes you freeze before you've drawn a single line. Here's the thing — it works the same way learning to drive does.
That's exactly how Artma structures its program. The first two weeks are about building that foundation — not just how to use Procreate's tools, but why they work the way they do. By the end of week two, you're not following instructions anymore. You understand what you're doing.
Learn the Fundamentals
- ◦ How digital brushes mimic real media
- ◦ Understanding layers, masks, and blending
- ◦ Line confidence and proportion basics
- ◦ Colour theory applied directly in Procreate
- ◦ Light, shadow, and shading fundamentals
Practice with a Live Instructor
- ◦ Apply what you've learnt in real time
- ◦ Get feedback on your work directly
- ◦ New technique or project every week
- ◦ Draw alongside others at the same stage
- ◦ Ask questions, get answers — not a recording
Once the basics are solid, the weekly sessions become where your style develops. The foundation is taught once. The practice never stops.
Join the Free Workshop →Learn Digital Art the Right Way — For Free
Having Procreate is a start. Knowing what to draw, how to build fundamentals, and how to actually improve — that's what Artma's free workshop is about.
Join the Free Workshop → Free · Live · Beginner-friendly · No prior experience needed